Serververse · Migrate
Move your game server to Serververse.
Self-migrate from another game host with a backup upload or Squid Panel Server Transfer / Importer. This guide covers Minecraft-oriented steps, a cutover checklist and how to ask support when no transfer tool exists.
Overview
You are moving a live or archived game server from another provider onto Serververse. Plan for a short maintenance window so players do not write to the old world while you cut over.
Before you start
- An active Serververse game server (or Minecraft plan) with enough disk for the full world, plugins and mods.
- Access to the old host: panel backup download, SFTP/FTP or a zip/tar export.
- Matching game version and loader where it matters (Vanilla, Paper, Fabric, Forge, and so on).
- Squid Panel login for file manager, SFTP credentials and Server Transfer / Importer.
Pick the path that fits
- Path A. Download a backup or pull files over SFTP from the old host, then upload into Serververse.
- Path B. Use Squid Panel Server Transfer / Importer when your old host is supported for a direct pull.
- If neither works, ask support to migrate for you during business hours. Details are in Ask us to migrate below.
Path A: transfer or export from the other host
Use this when you can download a backup from the old panel or when you already have SFTP access to the old files. You then upload into Squid Panel with SFTP or the web file manager.
- Stop writes on the old serverStop the old game process (or put it in a no-join state) so the world and databases are consistent. Note the exact game version and any loader or jar name.
- Export from the old hostPrefer a full server backup zip if the old panel offers one. Otherwise connect with SFTP/FTP and download the world folder, plugins or mods, configs and any data folders your game uses.
- Create or open your Serververse serverIn Squid Panel, confirm disk space and set the same major/minor version (and Paper / Fabric / Forge where required) before you overwrite files.
- Upload to SerververseUse Squid Panel SFTP credentials or the web file manager. Upload the archive or extract and place folders into the server root so paths match what the game expects (for example
world/,plugins/,mods/). - Start and verifyStart the Serververse server, watch the console for missing plugins or version errors, then join and check the world, permissions and whitelist.
Path B: Server Transfer / Importer in Squid Panel
Many common game hosts can be pulled directly through Squid Panel Server Transfer / Importer. Use this when your previous provider appears in the importer list and you have credentials for that old panel.
How the importer works
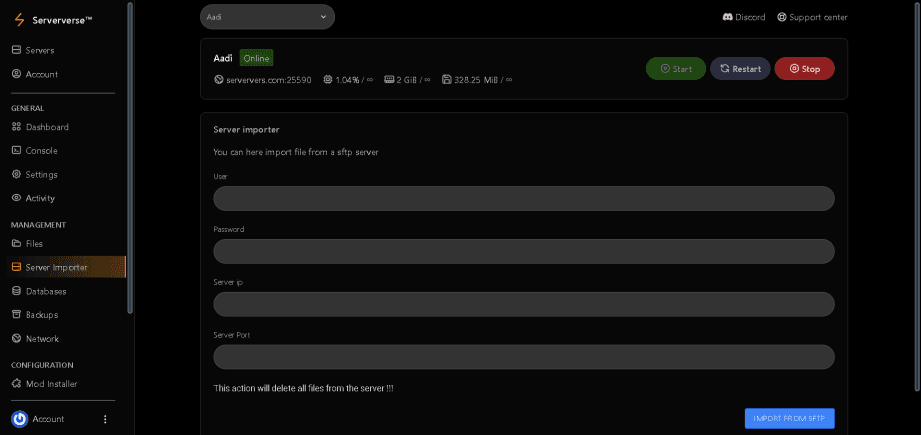
- Open Server Transfer / Importer from your server (see the panel screenshot).
- Choose the old host and sign in. Select the provider (or generic SFTP where offered), then enter the credentials the importer asks for.
- Select what to pull. Prefer a full server import. If you only need the world, keep plugins and configs in sync.
- Wait for completion, then start. Do not start mid-transfer. Match versions if prompted, then run the cutover checklist.
Minecraft-oriented steps
Minecraft migrations succeed when world data, plugins or mods and configs stay together on a matching server type and version. Use SFTP for large worlds; use the file manager for quick edits and small uploads.
World folders
Copy world/ and also world_nether/ and world_the_end/ when those exist. Keep the same level name in server.properties (level-name) after upload.
Plugins & data
Upload the plugins/ folder with jars and their data directories. Rebuild or re-download plugins only if the new Paper/Spigot version requires it.
Mods & loaders
For Fabric or Forge, match the loader and Minecraft version first, then upload mods/ (and config/ when present). Mixed versions are a common join failure.
Configs & properties
Bring over server.properties, bukkit.yml, spigot.yml, paper*.yml, permission plugins and economy data. Re-check ports and view-distance after the move; Serververse assigns the listen port.
Whitelist & ops
Copy whitelist.json, ops.json, and banned-*.json if you use them. Confirm online-mode and UUID style match the old server so skins and permissions stay correct.
SFTP + file manager
Use SFTP for multi-gigabyte worlds and modpacks. Use the Squid Panel file manager to unzip archives, tweak server.properties or fix a single config without a full re-upload.
Cutover checklist
Run this sequence once files are on Serververse. The goal is one clean switch with no split brain between old and new.
- Stop the old server so players cannot keep writing to the previous world.
- Finish the upload or importer job and confirm folders landed in the expected paths.
- Match version and loader on the Serververse side before the first start.
- Start the new server and watch the console for errors, missing plugins or world conversion messages.
- Test join with an admin account: spawn, inventory, permissions, whitelist and any critical plugins.
- Update DNS or subdomain (SRV, A/AAAA or panel subdomain) to the new address. Keep the old host offline until TTL clears and players settle on the new IP.
No transfer tool? Ask support to migrate for you
If the old host is not in the importer list, backups fail or you prefer an assisted move, open a ticket or contact us. Support works during business hours and aims to reply within 24 to 48 hours. We cannot guarantee immediate human support on every request. For emergencies, use the hotline or WhatsApp listed on Contact.
In the ticket, include the old host name, game and version, approximate world size, and whether you can share temporary SFTP or panel access. Hotline details are on /contact.
Ready to cut over?
Open Squid Panel to start an import or follow Path A with SFTP. Questions about versions or disk size go to Contact during business hours.
Migrations guide
Migrate to Serververse - self-serve or assisted
Move game worlds, panels and cloud workloads to Serververse with self-serve transfer steps or support-assisted migrations on business days.
Use server transfer plugins when available or SFTP/panel importers for common game hosts. If tooling is missing, ask support to help.
Cloud migrations from AWS/GCP and similar providers are quote-based on the Cloud product page.
Migrations: Serververse vs typical alternatives
Transparent India + global capacity with Serververse Shield.
| Feature | Serververse | Typical alternative |
|---|---|---|
| India presence | Noida & Mumbai capacity | Often overseas-only POPs |
| Protection | Serververse Shield | Paid add-ons or none |
| Support | Business-hours tickets · /contact hotline | Opaque chatbot-only queues |
| Billing | INR-friendly checkout | USD + forex |
What Serververse Migrations covers
- Production-ready networkGlobal capacity uplinks and regional edges tuned for real traffic.
- Serververse ShieldAlways-on mitigation paths documented per region.
- Clear next stepsOrder from the store, migrate via /migrate or contact for custom quotes.
- Human support windowTickets in 24-48 hours on business days; emergencies via /contact.
Quick answers - Migrate game server · transfer Minecraft · AWS migration · Serververse migrate.